Category: Coding & Scripting
This category contains all posts about coding and scripting. It combines topics like programming and scripting languages, best practices for coding styles and documentation, and others.
-

Pecl: fixing “fatal error: ‘pcre2.h’ file not found”
When using pecl to install a PHP extension, I always got a “fatal error: ‘pcre2.h’ file not found” after PHP has been updated. The update was done using brew upgrade php. In my case, this happens when I try to install pcov using: The output was: To fix the issue, make sure you have pcre2…
-

jQuery methods in plain JavaScript
Life is already very complex, so let’s simplify your projects by removing all the jQuery code. Plain JavaScript provides the same functionalities and it does not require any additional frameworks. And it’s supported by most of the modern browsers out of the box. This is a list of replacements for your daily used jQuery methods.…
-

Flutter: How to remove the debug banner during development
By default, Flutter shows a debug banner on the top right corner of an app, that indicates that the app was build in debug mode. This banner… … is intended to deter people from complaining that your app is slow when it’s in debug mode. In debug mode, Flutter enables a large number of expensive…
-

PHP: Function utf8_decode() and utf8_encode() have been deprecated
The utf8_encode() and utf8_decode() functions in PHP are used for encoding and decoding strings between ISO-8859-1 (Latin-1) encoding and UTF-8 encoding. While PHP’s standard library does include utf8_encode and utf8_decode functions, they are limited to converting between ISO-8859-1 (Latin-1) and UTF-8 encodings. It is important to note that these functions cannot be relied upon to…
-
Wo ist meine php.ini?
Wo die aktuell verwendete php.ini gespeichert ist, lässt sich ganz einfach über phpinfo() ermitteln. Dazu einfach eine neue php-Datei im Web-Verzeichnis speichern und mit folgendem Inhalt füllen: Wird diese Datei über den Browser aufgerufen, dann ist aus der Ausgabe der Funktion phpinfo() ersichtlich, welche php.ini gerade verwendet wird: Die wichtigen Punkte sind hierbei Loaded Configuration…
-

Flutter: how to create a better MaterialColor from Color
In Flutter, MaterialColor is a class that defines a color palette to be used within a Material Design app. It creates a set of shades for a given primary color, which can be used in various components of the UI, such as buttons, text fields, and navigation bars. MaterialColor objects can be created from a…
-

Flutter: how to sort a list of objects by one of its properties
In Flutter (Dart), there are different posibilities to sort a list of objects by one of its properties. Let’s asume you have a list of Person objects that have a property name on which you want to sort the array. Sort a list using the sort() method Darts List class already provides an abstract sort…
-

mysqldump: how to exclude or include tables
mysqldump is a command-line tool used for creating database backups in MySQL. By default, mysqldump includes all tables of the specified database when creating the dump. In some cases, it is useful to exclude some of the tables or even include only some of them. For me, this helped to exclude one of the biggest…
-

JavaScript: simple code structure for libraries
The code of a JavaScript library might get very complex over time. This can be a problem for maintenance and expandability. When writing a library, you should address two main points: The following “template” provides a simple code structure that fulfills those points: You can use such a library the following way: Inspiration: https://stackoverflow.com/questions/13606188/writing-a-library-what-structure Photo…
-
Flutter: red text and yellow lines in Text widget
When using a text widget, there are some configurations where the text turns red and gets yellow lines. In my case, it looks like in the following image. The reason for this is a lack of style parameters from the parent widget. The red text shows that there is no color information available. The yellow…
-
PHP: rounding a number and keeping the zeros after comma
In PHP you can use the round() method to round a double. This methods accepts a precision value as second parameter. Some examples: When using round() on a value like 3.0000 the conversion to a string will result in just “3”: This is not wrong, but when you want to have a constant precision for…
-

PHP: get version details from composer.json
Composer is a tool for dependency management in PHP. It allows PHP developers to easily manage and install the libraries and packages their projects depend on. Composer simplifies the process of including external libraries into PHP projects and helps manage versioning and dependencies. The packages that are required for your project are located in a…
-
GitLab CI + Flutter: pub: command not found
In one of my projects, I used a GitLab environment to perform Flutter tests. For this, I setup my .gitlab-ci.yaml to use a Flutter docker image of cirrusci/flutter for code quality check or tests. The file looks like this: Up to version 2.10.* of the Flutter docker image, this worked fine. But starting with version…
-

MySQL error: Cannot truncate a table referenced in a foreign key constraint
By default, you cannot TRUNCATE (empty) a table that has foreign key constraints applied on it. This is to keep the data consistent over multiple tables that are linked by constraints. Nevertheless, it might be necessary to truncate all data from a table. Here are a few options you can consider to resolve this issue: Solution 1…
-

Markdown: how do I add a newline in a table?
When creating tables in markdown, you use the vertical line | to split the columns. Each line of the document represents a row of the table. So adding a normal line break will result in a new row by default. Let’s assume you have a table with a large text and you want to split…
-

Build and Release a Flutter App
This is a short description of the build and release workflow of a Flutter app. Updating the app’s version number To update the version number, navigate to the pubspec.yaml file and update the following line with the current version string: After the change, run: Build and release the iOS app A detailled description of the whole process…
-
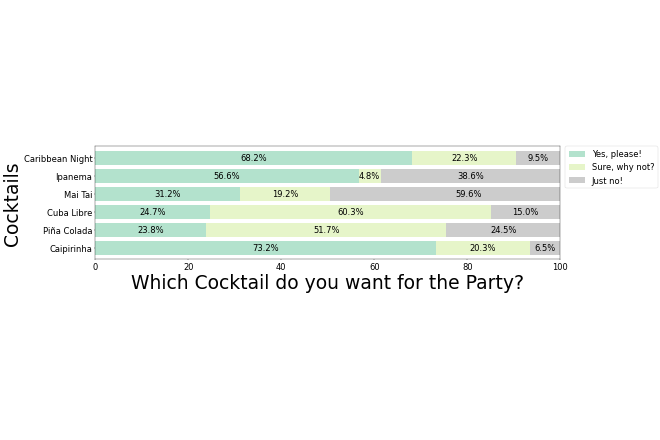
Free and Easy Horizontal Stacked Bar Graphs with Google Colab / Jupyter (as well as Python and Pandas)
Recently, my wife needed to create some stacked bar graphs for her publications. She wasn’t able to find a tool on the internet which allowed her to do this in an easy and shareable way. So I used this opportunity to look into Jupyter Notebooks. These notebooks allow you to document and run code and…
-
Dart: code snippets for faster coding
There are different concepts that improve the data handling in Dart. The following list of snippets is a collection of the most handy once. Warning: this might simplify your code a lot! 😉 The Spread Operator Dart supports the spread operator, which allows to insert a collection (multiple elements) into a collection: Operators Dart supports different…
-

brew: install Java on macOS
HomeBrew (brew) is a package manager to install software on macOS or Linux. Beside other packages, it’s possible to install Java on your system. The following steps will guide you through the installation. First, check the available Java related formulas: Currently, there are two different version of Java: java and java11. To check the version…
-
Flutter: enable scroll-to-top for nested Scaffolds (e.g. in IndexedStack)
When using nested Scaffolds (e.g. in combination with IndexedStack), the PrimaryScrollController is not usable by default. An IndexedStack will load all subviews so scroll-to-top will change all scrollable views at the same time, even if they are not visible or it simply does not work, because the PrimaryScrollController can only be attached to a single…