The Synology NAS system provides a convenient way to install software packages. One of those packages is Docker, which can be used to install additional software. This posts describes how to install and register GitLab Runner for Docker on a Synology NAS.
The setup described in this post has been tested on the following system:
- DS216+II with 8GB RAM
- DSM 6.2.3-25426 Update 2
In addition, the following software packages have already been installed on the system using the Synology package manager:
- Docker 18.09.0-0513
GitLab is installed via the Docker Registry:
- gitlab/gitlab-ce:latest (in my case GitLab 13.5.1-ce.0)
Install GitLab
You can skip this part, if GitLab is already running on your Synology and continue with the step Install GitLab Runner.
To install GitLab, open the Docker Registry and search for “gitlab”. Double click the entry gitlab/gitlab-ce:latest and select the latest version:

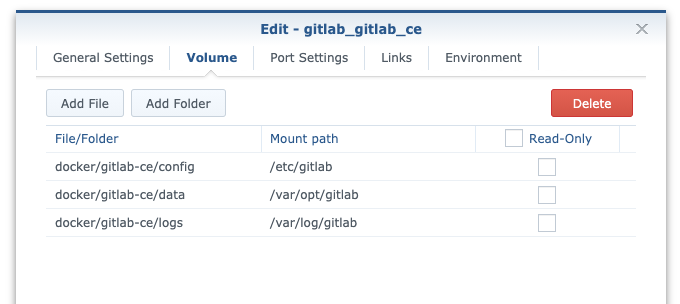
After the image is loaded, it will be listed under image. Launch this image and set the folders to be mounted as shown in the following image. This will simplify the access to the docker files within your Synology.


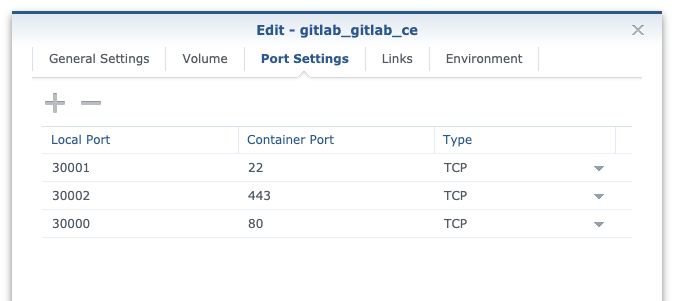
The port settings depend on your system. Normally, HTTP is accessible at port 80 or HTTPS on port 443. If your system already uses other apps that are running on those port, you can adjust them in Port Settings.
After completing the setup, it might take some time until the GitLab web surface is available. When accessing GitLab for the first time, you can specify a password for the root environment. The default username for the admin area is root. Now you can create user accounts, projects and perform any adjustments that fit your needs.
Install GitLab Runner
As the Synology DSM uses Docker to run GitLab, we can use Docker as well to install GitLab Runner. For this, connect to the Synology using SSH:
ssh <admin-user>@<synology> -p <port>Now we can install the Gitlab Runner Docker container that can run other Docker containers to perform the runner tasks:
docker run -d \
--name gitlab_runner_docker \
--restart always \<br>--network host \
-v /run/docker.sock:/var/run/docker.sock \
gitlab/gitlab-runner:latest
This will install a Docker container with the name gitlab_runner_docker which uses the same network as Docker (‘–network host‘).
As this container is the basis for our Docker-in-Docker setup, we connect the Docker socket of our main container to the new one by using -v /run/docker.sock:/var/run/docker.sock.
You might also use the Docker GUI of DSM to create the container. But the step above can only be done with the help of the console command!
To test the container, you can use the following command to connect to the console:
docker exec -it gitlab_runner_docker /bin/bashRegister the runner
Now it’s time to register the runner:
docker exec -it gitlab_runner_docker gitlab-runner registerThis will ask for some input:
Runtime platform                                    arch=amd64 os=linux pid=16 revision=e95f89a0 version=13.4.1
Running in system-mode.

Please enter the gitlab-ci coordinator URL (e.g. https://gitlab.com/):
http://10.0.6.102:30000/
Please enter the gitlab-ci token for this runner:
ab1234abcd1234abcd12
Please enter the gitlab-ci description for this runner:
[synology]: docker_alpine
Please enter the gitlab-ci tags for this runner (comma separated):

Registering runner... succeeded                     runner=sA4DKorC
Please enter the executor: docker-ssh, parallels, docker+machine, kubernetes, docker, shell, ssh, virtualbox, docker-ssh+machine, custom:
docker
Please enter the default Docker image (e.g. ruby:2.6):
alpine:latest
Runner registered successfully. Feel free to start it, but if it's running already the config should be automatically reloaded!
In this case, the executor docker and the base image alpine:latest is used for this container.
If you use a self-signed certificate for GItLab, then you have to specify the certificate with the option --tls-ca-file during registration:
docker exec -it gitlab_runner_docker gitlab-runner register --tls-ca-file /path/to/fullchain.pemSetup Docker-in-Docker
Let’s connect to the bash terminal of this container to change some settings:
docker exec -it gitlab_runner_docker /bin/bashThe created Docker container is an alpine base system without any packages installed. To perform the changes, we need a simple terminal text editor like nano or vim. The following commands will install nano for this task:
apt-get update
apt-get install nano
Now you can use nano to edit the GitLab Runner config file:
nano /etc/gitlab-runner/config.tomlAnd add the following lines as highlighted in the config file below:
clone_url = "http://10.0.6.102:30000/"
privileged = true
pull_policy = "if-not-present"
concurrent = 1
check_interval = 0
[session_server]
session_timeout = 1800
[[runners]]
name = "GitLab Runner Docker"
url = "http://10.0.6.102:30000/"
clone_url = "http://10.0.6.102:30000/"
token = "Examp1eT0ken"
executor = "docker"
[runners.docker]
tls_verify = false
image = "node:latest"
disable_entrypoint_overwrite = false
oom_kill_disable = false
disable_cache = false
volumes = ["/cache"]
shm_size = 0
privileged = true
pull_policy = "if-not-present"
[runners.cache]
[runners.cache.s3]
[runners.cache.gcs]That’s it. Now you can use this GitLab Runner for your repositories and run jobs by using other Docker containers.
Example usage in .gitlab-ci.yml
The following example uses a php container to run tests for a simple PHP application and deploy the code to a server. Some of the settings depend on the setup of your PHP application, so the example will not work out of the box. But it can give you a good idea of what is possible.
# https://hub.docker.com/_/php
image: php:7.4-fpm

services:
  - mysql:5.7

variables:
  # Configure mysql environment variables (https://hub.docker.com/_/mysql/)
  MYSQL_USER: $MYSQL_USER
  MYSQL_PASSWORD: $MYSQL_PASSWORD

before_script:
  # Initialize database, etc

stages:
  - test
  - deploy

test:
  stage: test
  script:
    - composer install
    - composer phpunit

deploy_production:
  stage: deploy
  environment:
    name: production
    url: https://www.example.com
  script:
    # run on server 'git checkout master && git pull origin master && exit'
  only:
    - master
Leave a Reply